NGINX WAF
40 Topics
Separating False Positives from Legitimate Violations
Imagine you make yourself a cup of tea and now want to extract the tannins and caffeine from the homogeneous mixture. How do you do it? Similarly, when building and protecting applications, you brew a blend of legitimate violations and false positives (distinct substances with similar properties) that match the rules you have defined in your web application firewall (WAF). How do you separate the false positives from legitimate violations? Before you decaffeinate your tea, let’s review some context around false positives and the challenges they pose in application security. False positives occur when legitimate requests are identified as attacks or violations. Due to the complex nature of web applications, false positives are a normal aspect of application security. It is preferable for a WAF to trigger false positives than to allow false negatives (attacks perceived as legitimate traffic). However, reducing the rate of false positives without compromising application security remains a significant challenge for security professionals. A high false positive rate has the following disadvantages: · Obstructs legitimate traffic · Increases maintenance · Burdens computer resources One way to extract the caffeine from your tea, chemically, is to introduce a solvent to neutralize the caffeine. Similarly, separating false positives from legitimate violations require the introduction of a solvent, of sorts, to neutralize the false positives among all the legitimate violations found in our WAF log. The challenge is designing the so-called solvent. Applications are unique and require a deep understanding of architecture, business flow and also your configured WAF rules in order to define the necessary properties for each so-called solvent. For example, using ‘square brackets in parameter name’ as a so-called solvent, is a common practice in the Drupal application development, yet many default WAF rules will flag it as a violation and trigger the false positive.[1] Christian Folini, https://www.christian-folini.ch You should also consider other volumetric and statistical factors such as violation type, volume, and density when you design your so-called solvent. Generally 3 components are taken in consideration : Traffic: What are the characteristics (origin, destination, frequency, payload ...) of the traffic (HTTP Request/Response) that triggered the violation ?. Violation: What are the characteristics (Type of attack, Rule triggered , ) of the violation triggered ?. Application: What are the characteristics of the application that is processing the request ?. Once you have subtracted false positives, you can correct your WAF configurations and monitor for new violations, then repeat the process. The workflow looks like the following: 1. Design a solvent. 2. Sample web traffic and log all violations. 3. Apply all violations to the solvent. 4. Use analytical extraction or manual extraction to subtract false positives. 5. Correct your WAF with Rules Exclusion for the identified false positives. 6. Monitor both web traffic and application changes. 7. Repeat steps 1 through 6. As solvent properties are specific to applications, in the next article, we'll provide additional example of solvent properties for the most popular applications.1.2KViews6likes3Comments
Implementing BIG-IP WAF logging and visibility with ELK
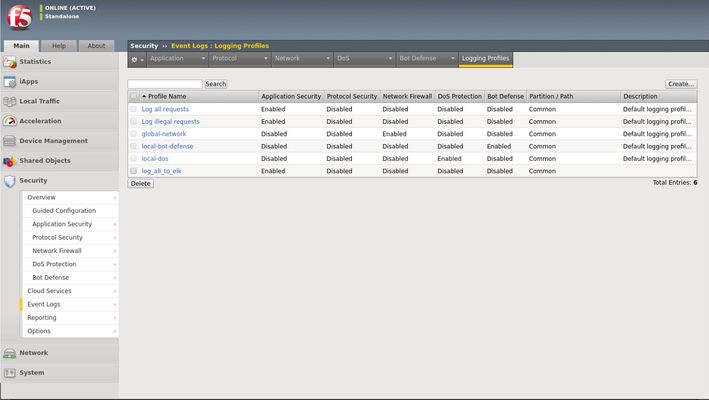
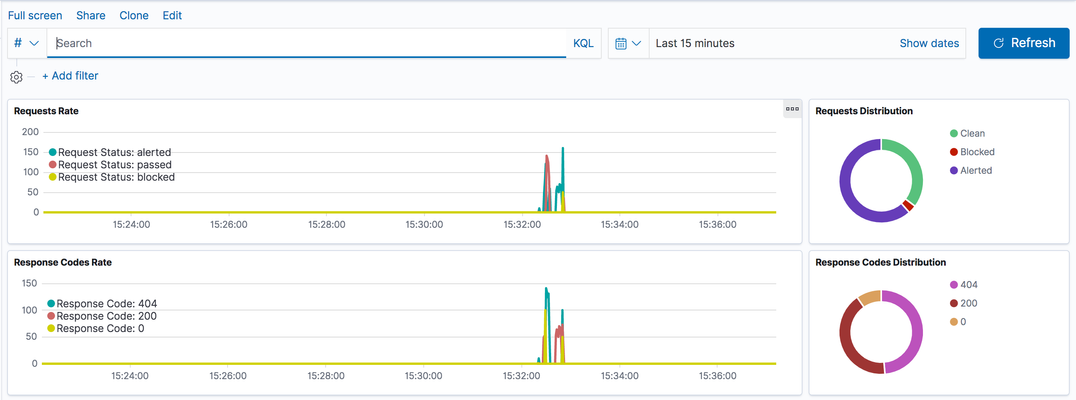
Scope This technical article is useful for BIG-IP users familiar with web application security and the implementation and use of the Elastic Stack. This includes, application security professionals, infrastructure management operators and SecDevOps/DevSecOps practitioners. The focus is for WAF logs exclusively. Firewall, Bot, or DoS mitigation logging into the Elastic Stack is the subject of a future article. Introduction This article focusses on the required configuration for sending Web Application Firewall (WAF) logs from the BIG-IP Advanced WAF (or BIG-IP ASM) module to an Elastic Stack (a.k.a. Elasticsearch-Logstash-Kibana or ELK). First, this article goes over the configuration of BIG-IP. It is configured with a security policy and a logging profile attached to the virtual server that is being protected. This can be configured via the BIG-IP user interface (TMUI) or through the BIG-IP declarative interface (AS3). The configuration of the Elastic Strack is discussed next. The configuration of filters adapted to processing BIP-IP WAF logs. Finally, the article provides some initial guidance to the metrics that can be taken into consideration for visibility. It discusses the use of dashboards and provides some recommendations with regards to the potentially useful visualizations. Pre-requisites and Initial Premise For the purposes of this article and to follow the steps outlined below, the user will need to have at least one BIG-IP Adv. WAF running TMOS version 15.1 or above (note that this may work with previous version but has not been tested). The target BIG-IP is already configured with: A virtual Server A WAF policy An operational Elastic Stack is also required. The administrator will need to have configuration and administrative privileges on both the BIG-IP and Elastic Stack infrastructure. They will also need to be familiar with the network topology linking the BIG-IP with the Elastic Search cluster/infrastructure. It is assumed that you want to use your Elastic Search (ELK) logging infrastructure to gain visibility into BIG-IP WAF events. Logging Profile Configuration An essential part of getting WAF logs to the proper destination(s) is the Logging Profile. The following will go over the configuration of the Logging Profile that sends data to the Elastic Stack. Overview of the steps: Create Logging Profile Associate Logging Profile with the Virtual Server After following the procedure below On the wire, logs lines sent from the BIG-IP are comma separated value pairs that look something like the sample below: Aug 25 03:07:19 localhost.localdomainASM:unit_hostname="bigip1",management_ip_address="192.168.41.200",management_ip_address_2="N/A",http_class_name="/Common/log_to_elk_policy",web_application_name="/Common/log_to_elk_policy",policy_name="/Common/log_to_elk_policy",policy_apply_date="2020-08-10 06:50:39",violations="HTTP protocol compliance failed",support_id="5666478231990524056",request_status="blocked",response_code="0",ip_client="10.43.0.86",route_domain="0",method="GET",protocol="HTTP",query_string="name='",x_forwarded_for_header_value="N/A",sig_ids="N/A",sig_names="N/A",date_time="2020-08-25 03:07:19",severity="Error",attack_type="Non-browser Client,HTTP Parser Attack",geo_location="N/A",ip_address_intelligence="N/A",username="N/A",session_id="0",src_port="39348",dest_port="80",dest_ip="10.43.0.201",sub_violations="HTTP protocol compliance failed:Bad HTTP version",virus_name="N/A",violation_rating="5",websocket_direction="N/A",websocket_message_type="N/A",device_id="N/A",staged_sig_ids="",staged_sig_names="",threat_campaign_names="N/A",staged_threat_campaign_names="N/A",blocking_exception_reason="N/A",captcha_result="not_received",microservice="N/A",tap_event_id="N/A",tap_vid="N/A",vs_name="/Common/adv_waf_vs",sig_cves="N/A",staged_sig_cves="N/A",uri="/random",fragment="",request="GET /random?name=' or 1 = 1' HTTP/1.1\r\n",response="Response logging disabled" Please choose one of the methods below. The configuration can be done through the web-based user interface (TMUI), the command line interface (TMSH), directly with a declarative AS3 REST API call, or with the BIG-IP native REST API. This last option is not discussed herein. TMUI Steps: Create Profile Connect to the BIG-IP web UI and login with administrative rights Navigate to Security >> Event Logs >> Logging Profiles Select “Create” Fill out the configuration fields as follows: Profile Name (mandatory) Enable Application Security Set Storage Destination to Remote Storage Set Logging Format to Key-Value Pairs (Splunk) In the Server Addresses field, enter an IP Address and Port then click on Add as shown below: Click on Create Add Logging Profile to virtual server with the policy Select target virtual server and click on the Security tab (Local Traffic >> Virtual Servers : Virtual Server List >> [target virtualserver] ) Highlight the Log Profile from the Available column and put it in the Selected column as shown in the example below (log profile is “log_all_to_elk”): Click on Update At this time the BIG-IP will forward logs Elastic Stack. TMSH Steps: Create profile ssh into the BIG-IP command line interface (CLI) from the tmsh prompt enter the following: create security log profile [name_of_profile] application add { [name_of_profile] { logger-type remote remote-storage splunk servers add { [IP_address_for_ELK]:[TCP_Port_for_ELK] { } } } } For example: create security log profile dc_show_creation_elk application add { dc_show_creation_elk { logger-type remote remote-storage splunk servers add { 10.45.0.79:5244 { } } } } 3. ensure that the changes are saved: save sys config partitions all Add Logging Profile to virtual server with the policy 1. From the tmsh prompt (assuming you are still logged in) enter the following: modify ltm virtual [VS_name] security-log-profiles add { [name_of_profile] } For example: modify ltm virtual adv_waf_vs security-log-profiles add { dc_show_creation_elk } 2. ensure that the changes are saved: save sys config partitions all At this time the BIG-IP sends logs to the Elastic Stack. AS3 Application Services 3 (AS3) is a BIG-IP configuration API endpoint that allows the user to create an application from the ground up. For more information on F5’s AS3, refer to link. In order to attach a security policy to a virtual server, the AS3 declaration can either refer to a policy present on the BIG-IP or refer to a policy stored in XML format and available via HTTP to the BIG-IP (ref. link). The logging profile can be created and associated to the virtual server directly as part of the AS3 declaration. For more information on the creation of a WAF logging profile, refer to the documentation found here. The following is an example of a pa rt of an AS3 declaration that will create security log profile that can be used to log to Elastic Stack: "secLogRemote": { "class": "Security_Log_Profile", "application": { "localStorage": false, "maxEntryLength": "10k", "protocol": "tcp", "remoteStorage": "splunk", "reportAnomaliesEnabled": true, "servers": [ { "address": "10.45.0.79", "port": "5244" } ] } In the sample above, the ELK stack IP address is 10.45.0.79 and listens on port 5244 for BIG-IP WAF logs. Note that the log format used in this instance is “Splunk”. There are no declared filters and thus, only the illegal requests will get logged to the Elastic Stack. A sample AS3 declaration can be found here. ELK Configuration The Elastic Stack configuration consists of creating a new input on Logstash. This is achieved by adding an input/filter/ output configuration to the Logstash configuration file. Optionally, the Logstash administrator might want to create a separate pipeline – for more information, refer to this link. The following is a Logstash configuration known to work with WAF logs coming from BIG-IP: input { syslog { port => 5244 } } filter { grok { match => { "message" => [ "attack_type=\"%{DATA:attack_type}\"", ",blocking_exception_reason=\"%{DATA:blocking_exception_reason}\"", ",date_time=\"%{DATA:date_time}\"", ",dest_port=\"%{DATA:dest_port}\"", ",ip_client=\"%{DATA:ip_client}\"", ",is_truncated=\"%{DATA:is_truncated}\"", ",method=\"%{DATA:method}\"", ",policy_name=\"%{DATA:policy_name}\"", ",protocol=\"%{DATA:protocol}\"", ",request_status=\"%{DATA:request_status}\"", ",response_code=\"%{DATA:response_code}\"", ",severity=\"%{DATA:severity}\"", ",sig_cves=\"%{DATA:sig_cves}\"", ",sig_ids=\"%{DATA:sig_ids}\"", ",sig_names=\"%{DATA:sig_names}\"", ",sig_set_names=\"%{DATA:sig_set_names}\"", ",src_port=\"%{DATA:src_port}\"", ",sub_violations=\"%{DATA:sub_violations}\"", ",support_id=\"%{DATA:support_id}\"", "unit_hostname=\"%{DATA:unit_hostname}\"", ",uri=\"%{DATA:uri}\"", ",violation_rating=\"%{DATA:violation_rating}\"", ",vs_name=\"%{DATA:vs_name}\"", ",x_forwarded_for_header_value=\"%{DATA:x_forwarded_for_header_value}\"", ",outcome=\"%{DATA:outcome}\"", ",outcome_reason=\"%{DATA:outcome_reason}\"", ",violations=\"%{DATA:violations}\"", ",violation_details=\"%{DATA:violation_details}\"", ",request=\"%{DATA:request}\"" ] } break_on_match => false } mutate { split => { "attack_type" => "," } split => { "sig_ids" => "," } split => { "sig_names" => "," } split => { "sig_cves" => "," } split => { "staged_sig_ids" => "," } split => { "staged_sig_names" => "," } split => { "staged_sig_cves" => "," } split => { "sig_set_names" => "," } split => { "threat_campaign_names" => "," } split => { "staged_threat_campaign_names" => "," } split => { "violations" => "," } split => { "sub_violations" => "," } } if [x_forwarded_for_header_value] != "N/A" { mutate { add_field => { "source_host" => "%{x_forwarded_for_header_value}"}} } else { mutate { add_field => { "source_host" => "%{ip_client}"}} } geoip { source => "source_host" } } output { elasticsearch { hosts => ['localhost:9200'] index => "big_ip-waf-logs-%{+YYY.MM.dd}" } } After adding the configuration above to the Logstash parameters, you will need to restart the Logstash instance to take the new logs into configuration. The sample above is also available here. The Elastic Stack is now ready to process the incoming logs. You can start sending traffic to your policy and start seeing logs populating the Elastic Stack. If you are looking for a test tool to generate traffic to your Virtual Server, F5 provides a simple WAF tester tool that can be found here. At this point, you can start creating dashboards on the Elastic Stack that will satisfy your operational needs with the following overall steps: · Ensure that the log index is being created (Stack Management >> Index Management) · Create a Kibana Index Pattern (Stack Management>>Index patterns) · You can now peruse the logs from the Kibana discover menu (Discover) · And start creating visualizations that will be included in your Dashboards (Dashboards >> Editing Simple WAF Dashboard) A complete Elastic Stack configuration can be found here – note that this can be used with both BIG-IP WAF and NGINX App Protect. Conclusion You can now leverage the widely available Elastic Stack to log and visualize BIG-IP WAF logs. From dashboard perspective it may be useful to track the following metrics: -Request Rate -Response codes -The distribution of requests in term of clean, blocked or alerted status -Identify the top talkers making requests -Track the top URL’s being accessed -Top violator source IP An example or the dashboard might look like the following:15KViews5likes6Comments
Dashboards for NGINX App Protect
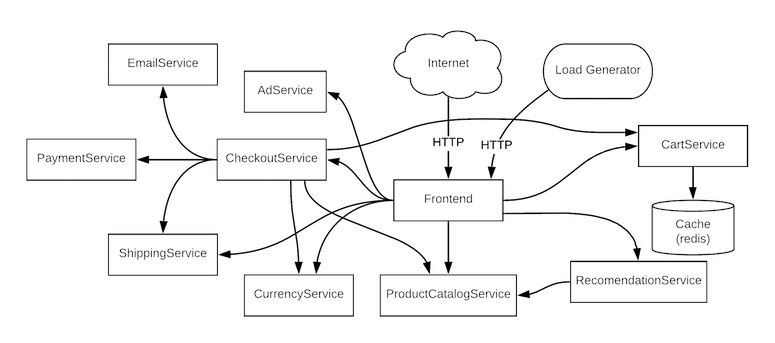
Introduction NGINX App Protect is a new generation WAF from F5 which is built in accordance with UNIX philosophy such that it does one thing well everything else comes from integrations. NGINX App Protect is extremely good at HTTP traffic security. It inherited a powerful WAF engine from BIG-IP and light footprint and high performance from NGINX. Therefore NGINX App Protect brings fine-grained security to all kinds of insertion points where NGINX use to be either on-premises or cloud-based. Therefore NGINX App Protect is a powerful and flexible security tool but without any visualization capabilities which are essential for a good security product. As mentioned above everything besides primary functionality comes from integrations. In order to introduce visualization capabilities, I've developed an integration between NGINX App Protect and ELK stack (Elasticsearch, Logstash, Kibana) as one of the most adopted stacks for log collection and visualization. Based on logs from NGINX App Protect ELK generates dashboards to clearly visualize what WAF is doing. Overview Dashboard Currently, there are two dashboards available. "Overview" dashboard provides a high-level view of the current situation and also allows to discover historical trends. You are free to select any time period of interest and filter data simply by clicking on values right on the dashboard. Table at the bottom of the dashboard lists all requests within a time frame and allows to see how exactly a request looked like. False Positives Dashboard Another useful dashboard called "False Positives" helps to identify false positives and adjust WAF policy based on findings. For example, the chart below shows the number of unique IPs that hit a signature. Under normal conditions when traffic is mostly legitimate "per signature" graphs should fluctuate around zero because legitimate users are not supposed to hit any of signatures. Therefore if there is a spike and amount of unique IPs which hit a signature is close to the total amount of sources then likely there is a false positive and policy needs to be adjusted. Conclusion This is an open-source and community-driven project. The more people contribute the better it becomes. Feel free to use it for your projects and contribute code or ideas directly to the repo. The plan is to make these dashboards suitable for all kinds of F5 WAF flavors including AWAF and EAP. This should be simple because it only requires logstash pipeline adjustment to unify logs format stored in elasticsearch index. If you have a project for AWAF or EAP going on and would like to use dashboards please feel free to develop and create a pull request with an adjusted logstash pipeline to normalize logs from other WAFs. Github repo: https://github.com/464d41/f5-waf-elk-dashboards Feel free to reach me with questions. Good luck!2.3KViews4likes1CommentCloud Template for App Protect WAF
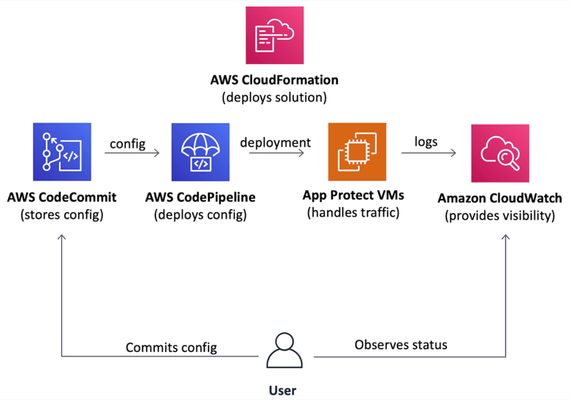
Introduction Everybody needs a WAF. However, when it gets to a deployment stage a team usually realizes that production-grade deployment going to be far more complex than a demo environment. In the case of a cloud deployment VPC networking, infrastructure security, VM images, auto-scaling, logging, visibility, automation, and many more topics require detailed analysis. Usually, it takes at least a few weeks for an average team to design and implement a production-grade WAF in a cloud. That is the one side of the problem. Additionally, cloud deployment best practices are the same for everyone, therefore most of well-made WAF deployments follow a similar path and become similar at the end. The statements above bring us to an obvious conclusion that proper WAF deployment can be templatized. So a team doesn’t spend time on deployment and maintenance but starts to use a WAF from day zero. The following paragraphs introduce a project that implements a Cloud Formation template to deploy production-grade WAF in AWS cloud just in a few clicks. Project (GitHub) On a high level, the project implements a Cloud Formation template that automatically deploys a production-grade WAF to AWS cloud. The template aims to follow cloud deployment best practices to set up a complete solution that is fully automated, requires minimum to no infrastructure management, therefore, allows a team to focus on application security. The following picture represents the overall solution structure. The solution includes a definition of three main components. Auto-scaling data plane based on official NGINX App Protect AWS AMI images. Git repository as the source of data plane and security configuration. Visibility dashboards displaying the WAF health and security data. Therefore it becomes a complete and easy-to-use solution to protect applications whether they run in AWS or in any other location. Data Plane: Data plane auto-scales based on the amount of incoming traffic and uses official NGINX App Protect AWS AMIs to spin up new VM instances. That removes the operational headache and optimizes costs since WAF dynamically adjusts the amount of computing resources and charges a user on an as-you-go basis. Configuration Plane: Solution configuration follows GitOps principles. The template creates the AWS CodeCommit git repository as a source of forwarding and security configuration. AWS CodeDeploy pipeline automatically delivers a configuration across all data plane VMs. Visibility: Alongside the data plane and configuration repository the template sets up a set of visibility dashboards in AWS CloudWatch. Data plane VMs send logs and metrics to CloudWatch service that visualizes incoming data as a set of charts and tables showing WAF health and security violations. Therefore these three components form a complete WAF solution that is easy to deploy, doesn't impose any operational headache and provides handy interfaces for WAF configuration and visibility right out of the box. Demo As mentioned above, one of the main advantages of this project is the ease of WAF deployment. It only requires downloading the AWS CloudFormation template file from the project repository and deploy it whether via AWS Console or AWS CLI. Template requests a number of parameters, however, all they are optional. As soon as stack creation is complete WAF is ready to use. Template outputs contain WAF URL and pointer to configuration repository. By default the WAF responds with static page. As a next step, I'll put this cloud WAF instance in front of a web application. Similar to any other NGINX instance, I'll configure it to forward traffic to the app and inspect all requests with App Protect WAF. As mentioned before, all config lives in a git repo that resides in the AWS CodeCommit service. I'm adjusting the NGINX configuration to forward traffic to the protected application. Once committed to the repo, a pipeline delivers the change to all data plane VMs. Therefore all traffic redirects to a protected application (screenshot below is not of a real company, and used for demo purposes only). Similar to NGINX configuration App Protect policy resides in the same repository. Similarly, all changes reflect running VMs. Once the configuration is complete, a user can observe system health and security-related data via pre-configured AWS CloudWatch dashboards. Outline As you can see, the use of a template to deploy a cloud WAF allows to significantly reduce time spent on WAF deployment and maintenance. Handy interfaces for configuration and visibility turn this project into a boxed solution allowing a user to easily operate a WAF and focus on application security. Please comment if you find useful to have this kind of solution in major public clouds marketplaces. It is a community project so far, and we need as much feedback as possible to steer one properly. Feel free to give it a try and leave feedback here or at the project's git repository. P.S.: Take a look to another community project that contributes to F5 WAF ecosystem: WAF Policy Editor990Views3likes0CommentsOverview of MITRE ATT&CK Tactic : TA0004 - Privilege Escalation
Introduction The Privilege Escalation tactic in the MITRE ATT&CK, covers techniques that adversaries use to gain higher-level permissions on compromised systems or networks. After gaining initial access, attackers frequently need elevated rights to access sensitive resources, execute restricted operations, or maintain persistence. Techniques include exploiting OS vulnerabilities, misconfigurations, or weaknesses in security controls to move from user-level to admin or root privileges. This may involve abusing elevation control mechanisms (like sudo, setuid, or UAC), manipulating accounts or tokens, leveraging scheduled tasks, or exploiting valid credentials. Techniques and Sub-Techniques T1548 – Abuse Elevation Control Mechanisms This technique involves bypassing or abusing OS mechanisms that restrict elevated execution, such as sudo, UAC, or setuid binaries. Here, adversaries exploit misconfigurations or weak rules to run commands with higher privileges. This often requires no exploit code but just permission misuse. Once elevated, attackers gain access to restricted system operations. T1548.001 – Setuid and Setgid Here, attackers run the programs with elevated permissions by abusing setuid/setgid bits on Unix systems. This allows execution as another user, often root, without needing the password. T1548.002 – Bypass User Account Control Adversaries exploit UAC weaknesses to elevate privileges without user approval.This grants admin-level execution while maintaining user-level stealth. T1548.003 – Sudo and Sudo Caching In these mis-configured sudo rules or cached credentials allow attackers to run privileged commands. They escalate without full authentication or bypass intended restrictions. T1548.004 – Elevated Execution with Prompt Here, malicious actors deceive users into granting elevated rights to a malicious process. This uses social engineering rather than technical exploitation. Temporary Elevated Cloud Access Cloud platforms issue temporary privileges through roles or tokens. Misconfigured role assumptions or temporary credentials can be abused to obtain short-term high-level access. TCC Manipulation This happens when attackers tamper with macOS’s privacy-control system to wrongfully grant apps access to sensitive resources like the camera, microphone, or full disk. It essentially bypasses user consent protections. T1134 - Access Token Manipulation Adversaries modify or steal Windows access tokens to make malicious processes run with the permission of another user. By impersonating these tokens, attackers can bypass access controls, escalate privileges, and perform actions as though they are legitimate users or even SYSTEM. Token Impersonation/Theft Here attackers duplicate and impersonate another user’s token, allowing their process to operate with the privileges of the legitimate user, this technique is frequently used to gain higher-level privileges on Windows machines. Create Process with Token Adversaries use a stolen or duplicated token to spawn a new process under the security context of a higher-privilege user, enabling the execution of actions with elevated permissions. Make and Impersonate Token Attackers generate new tokens using credentials they possess, then impersonate a target user's identity to gain unauthorized access and escalate their privileges. Parent PID Spoofing This technique manipulates the parent process ID (PPID) of a new process, so it appears to have a trusted parent, helping adversaries evade defenses or gain higher privileges. SID-History Injection Here, adversaries inject SID-History attributes into access tokens or Active Directory to spoof the permissions, this technique enables attackers to sidestep traditional group membership rules, granting them privileges that would normally be restricted. T1098 - Account Manipulation It refers to actions taken by attackers to preserve their access using compromised accounts, such as modifying credentials, group memberships, or account settings. By changing permissions or adding credentials, adversaries can escalate privileges, maintain persistence, or create hidden backdoors for future access. Additional Cloud Credentials Adversaries add their own keys, passwords, or service principal credentials to victim cloud accounts, enabling escalation without detection. This allows them to use new credentials and bypass standard log or security controls in cloud environments. Additional Email Delegate Permissions Attackers may grant themselves high-level permissions on email accounts, allowing unauthorized access, control or forwarding of sensitive communications, which can give visibility into victim correspondence for further attacks. Additional Cloud Roles Adversaries assign new privileged roles to compromised accounts, expanding permissions and enabling wider access to cloud resources. SSH Authorized Keys Attackers append or modify their public keys to SSH authorized_keys files on target machines. This technique bypass password authentication and allows undetected logins to compromised systems. Device Registration Adversaries register malicious devices with victim accounts, often in MFA or management portals to maintain ongoing access. This can allow attackers to access resources as trusted endpoints. Additional Container Cluster Roles Attackers grant their accounts extra permissions or roles in container orchestration systems such as Kubernetes. These elevated roles allow broader control over cluster resources and enable cluster-wide compromise. Additional Local or Domain Groups Adversaries add their accounts to privileged local or domain groups, gaining higher-level access and capabilities. This manipulates group memberships for escalation, persistence, and dominance within target environments. T1547 – Boot or Logon Autostart Execution Attackers abuse programs that automatically run during boot or login. These locations can be modified to launch malicious code with elevated privileges. This provides persistence and often higher-level execution. It is commonly achieved by manipulating registry keys, services, or startup folders. Registry Run Keys / Startup Folder: Attackers add malicious programs to Windows Registry run keys or Startup folders to ensure automatic execution when a user logs in. This technique provides persistent and often stealthy privilege escalation on system reboot and login. Authentication Package: By installing a malicious authentication package (DLL), adversaries can intercept credentials or execute code with system-level privileges during the Windows authentication process, enabling privilege escalation and persistence. Time Providers: Attackers register malicious DLLs as Windows time providers DLLs responsible for time synchronization so that their code is loaded by system processes on boot or at scheduled intervals, allowing stealthy system-level access and persistence. Winlogon Helper DLL: Adversaries plant a helper DLL in Winlogon’s registry settings so it loads with each user logon, running malicious code with high privileges and ensuring execution whenever the system starts or a user logs in. Security Support Provider: Inserting a rogue Security Support Provider (SSP) DLL allows attackers to monitor or manipulate authentication and system logins, potentially capturing credentials and persisting with SYSTEM privileges at the operating system level. Kernel Modules and Extensions: Attackers load malicious modules or kernel extensions to run arbitrary code in kernel space, giving them unrestricted control over the system, hiding their presence, or manipulating low-level OS behavior for privilege escalation. Re-opened Applications: On macOS, adversaries abuse property list files that track reopened applications after reboot, ensuring their chosen programs or payloads relaunch automatically and persistently escalate privileges upon user login. LSASS Driver: Modifying or adding an LSASS (Local Security Authority Subsystem Service) driver gives attackers persistent system-level code execution, potentially accessing or controlling authentication processes. Shortcut Modification: By altering shortcut files (LNKs), adversaries ensure that opening a benign application or file instead executes attacker-controlled code, effectively leveraging user actions for privilege escalation and persistence. Port Monitors: Attackers install or hijack port monitoring DLLs, which Windows loads to manage printers, so that their code runs with SYSTEM privileges when the service starts, enabling privilege escalation and persistence. Print Processors: Planting a malicious print processor DLL, the software Windows uses to handle print jobs causes Windows to execute attacker code as SYSTEM whenever print functions are called, creating a persistence and privilege escalation method. XDG Autostart Entries: On Linux desktop environments, adversaries use XDG-compliant autostart entries to launch malicious programs automatically at user login, gaining persistent execution and the ability to operate with user or escalated privileges. Active Setup: Attackers add or modify Active Setup registry keys to ensure their payloads execute with elevated privileges during user profile initialization, such as when a new user logs in. Login Items: On macOS, adversaries add login items that point to their malicious applications or scripts, guaranteeing code execution with the user’s privileges whenever a login event occurs. T1037 - Boot or Logon Initialization Scripts It refers to the use of scripts that are automatically executed during system startup or user logon to help adversaries maintain persistence on a machine. By modifying these scripts, attackers can ensure their malicious code runs every time the system boots. Logon Script (Windows): Scripts configured in Windows to run automatically during user or group logon can be exploited by adversaries to execute malicious code with the user’s privileges, enabling persistence or escalation. Login Hook: A login hook is an macOS mechanism that allows scripts or executables to run automatically upon a user’s login, which attackers may abuse to achieve persistence or elevate privileges. Network Logon Script: These are scripts assigned via Active Directory or Group Policy to execute during network logon, potentially allowing adversaries to introduce or persist malicious code in a domain environment. RC Scripts: On Unix-like systems, RC (run command) scripts control startup processes. Attackers who modify these can ensure their code runs with elevated privileges every time the system boots. Startup Items: Files or programs set to launch automatically during boot or user login can be manipulated by attackers, allowing persistent or privileged execution at startup. T1543 – Create or Modify System Process Attackers modify or create system services or daemons that run with high privileges. By altering service configurations, they ensure malicious code executes as SYSTEM/root. This provides long-term persistence and elevated access. Launch Agent: Attackers can create or modify launch agents on macOS to automatically execute malicious payloads whenever a user logs in, helping maintain persistence at the user level. Systemd Service: By altering systemd service files on Linux, adversaries can ensure their code runs as a background service during startup, maintaining continuous access to the system. Windows Service: Attackers abuse Windows service configurations to install or modify services that launch malicious programs on startup or at defined intervals, allowing persistent and privileged access. Launch Daemon: On macOS, launch daemons are set up to run background processes with elevated privileges before user login, often used by attackers to achieve system-wide persistence. Container Service: Adversaries may create or modify container or cluster management services (like Docker or Kubernetes agents) to repeatedly execute malicious code inside containers as part of persistence. T1484 - Domain or Tenant Policy Modification Adversaries changing configuration settings in a domain or tenant environment, such as Active Directory or cloud identity services, to bypass security controls and escalate privileges. This can include editing group policy objects, trust relationships, or federation settings, which may impact large numbers of users or systems across an organization. Attackers leverage this technique to gain persistent elevated access and make detection or remediation much more difficult. Group Policy Modification: Attackers may alter Group Policy Objects (GPOs) in Active Directory environments to subvert security settings and gain elevated privileges across the domain. By doing, these attackers can deploy malicious tasks, change user rights or disable security controls on many systems simultaneously. Trust Modification: Adversaries change domain or tenant trust relationships, such as adding, removing or altering trust properties between domains or tenants to expand their access and ensure continued control. This can let attackers move laterally, escalate privileges across multiple domains. T1611 – Escape to Host In virtualized environments, attackers attempt to escape a container or VM. If successful, they gain access to the underlying host system, which has higher privileges. This usually arises due to weaknesses in the hypervisor or insufficient separation between virtual environments. Hence, it gives complete control to the attacker over every workload operating on that host. T1546 – Event Triggered Execution Attackers use system events like service start, scheduled job, user login, etc. to trigger malicious code. These triggers often run with SYSTEM or administrative privileges. By hijacking legitimate event handlers, the attacker executes commands without raising suspicion. It also enables persistence tied to normal system operations. Change Default File Association: Attackers alter file type associations so that opening a file triggers malicious code, helping them gain persistence or escalate privileges. Screensaver: Adversaries can replace system screensavers with malicious executables, causing code to run automatically when the screensaver activates. Windows Management Instrumentation Event Subscription: By setting up WMI event subscriptions, attackers ensure their code executes in response to specific system events, establishing stealthy persistence on Windows. Unix Shell Configuration Modification: Modifying shell configuration files like .bashrc or.profile allows adversaries to start malicious code whenever a user opens a terminal session. Trap: Attackers abuse shell trap commands to execute code in response to system signals (e.g., shutdown, logoff, or errors), enhancing persistence or privilege escalation. LC_LOAD_DYLIB Addition: By adding malicious the LC_LOAD_DYLIB header to macOS binaries, attackers can force the system to load rogue dynamic libraries during execution. Netsh Helper DLL: Attackers register malicious DLLs as Netsh helpers, ensuring their code loads whenever Netsh is used, aiding persistence or privilege escalation. Accessibility Features: Abusing Windows accessibility tools (like Sticky Keys) lets attackers invoke system shells or backdoors at the login screen, bypassing standard authentication. AppCert DLLs: Adversaries inject DLLs via AppCert DLL Registry keys, so their code runs in every process creation, creating broad persistence. AppInit DLLs: Attackers exploit AppInit DLL Registry values to ensure their DLLs are loaded into multiple processes, maintaining persistence. Application Shimming: By creating or modifying Windows application shims, adversaries force the system to redirect legitimate programs to launch malicious code. Image File Execution Options Injection: Modifying Image File Execution Options (IFEO) in Registry allows attackers to set debuggers that hijack normal application launches for persistence. PowerShell Profile: Malicious code in PowerShell profile scripts will auto-run whenever PowerShell starts, providing persistence and privilege escalation opportunities. Emond: Attackers place malicious rules in macOS’s Emond event monitor daemon, causing code to run in response to system events. Component Object Model Hijacking: By hijacking references to COM objects in Windows, adversaries ensure their code launches when certain applications or system routines are invoked. Installer Packages: Attackers may leverage installer scripts or packages to deploy persistent code during application installation or updates. Udev Rules: By modifying Linux’s udev rules, adversaries configure devices to trigger the execution of rogue code during events like hardware insertion. Python Startup Hooks: Attackers add code to Python startup scripts or modules, causing their payload to run automatically whenever Python interpreter is launched. T1068 – Exploitation for Privilege Escalation Attackers exploit software or OS vulnerabilities to gain elevated rights. This may target kernel flaws, driver bugs, or misconfigured services. By triggering the vulnerability, adversaries escalate from low-privilege to SYSTEM/root. This is one of the most direct and powerful escalation methods. T1574 – Hijack Execution Flow This technique alters how the system resolves and launches programs. Attackers place malicious files where high-privilege processes expect legitimate ones. When the privileged process starts, it inadvertently loads or executes the attacker code. This leverages DLL search order hijacking, path hijacking, and similar methods. DLL: Attackers exploit the way Windows applications load Dynamic Link Libraries (DLLs), tricking them into running malicious DLLs for code execution or privilege escalation. Dylib Hijacking: Adversaries target macOS by placing malicious dylib files in directories searched by applications, causing them to be loaded instead of legitimate libraries. Executable Installer File Permissions Weakness: Attackers leverage weak permissions on installer files to replace or modify executables, allowing unauthorized code execution with high privileges. Dynamic Linker Hijacking: This technique manipulates the loading process of shared libraries (DLLs or dylibs), often abusing environment variables (like PATH) or loader settings to ensure malicious libraries are loaded first. Path Interception by PATH Environment Variable: Adversaries modify the PATH environment variable, influencing where the system searches for executables and libraries, enabling malicious code to be loaded. Path Interception by Search Order Hijacking: Attackers exploit insecure search orders for files or DLLs, placing malicious files in locations that applications check before trusted locations. Path Interception by Unquoted Path: By taking advantage of unquoted paths in executable calls, adversaries' plant malicious files that are incorrectly loaded by the system, allowing code execution. Services File Permissions Weakness: Weak permissions on Windows service files enable attackers to replace service executables with malicious content, gaining persistent system access. Services Registry Permissions Weakness: Adversaries exploit weak registry settings of Windows services, altering keys to redirect service execution to their malicious code. COR_PROFILER: Attackers abuse the COR_PROFILER environment variable to hijack the way . NET applications load profiling DLLs, gaining code execution during app runtime. KernelCallbackTable: This involves altering callback tables in the Windows kernel to redirect the execution flow, enabling arbitrary code to run with elevated privileges. AppDomainManager: By subverting the AppDomainManager in .NET applications, adversaries gain control over the loading of assemblies, potentially executing malicious payloads during application startup. T1055 – Process Injection This involves injecting malicious code into legitimate processes. Injected processes often run with higher privileges than the attacker initially has. It enables evasion of security tools by blending into trusted processes. Successful injection allows execution under a more privileged security context. Dynamic-link Library Injection: Injects malicious DLLs into live processes to execute unauthorized code in the process memory, enabling attackers to evade defenses and elevate privileges. Portable Executable Injection: Loads or maps a malicious executable (EXE) into the address space of another process, running code under the guise of a legitimate application. Thread Execution Hijacking: Redirects the execution flow of an active thread in a process to run attacker-controlled code, often used for stealthy payload delivery. Asynchronous Procedure Call (APC): Delivers malicious code by queuing attacker-specified functions (APCs) to run in the context of another process or thread. Thread Local Storage (TLS): Uses TLS callbacks within a process to execute injected code when the process loads DLLs, often leveraging this for covert malware execution. Ptrace System Calls: Exploits ptrace debugging capabilities (on Unix/Linux) to inject and execute malicious code within the address space of a targeted process. Proc Memory: Modifies memory structures directly through the /proc filesystem (Linux/Unix) to inject or alter code in running processes for persistence or privilege escalation. Extra Window Memory Injection: Injects code into special memory regions (like window memory in Windows GUI processes) to achieve code execution in those processes. Process Hollowing: Creates a legitimate process, then swaps its memory with attacker code, making malware run under the mask of valid processes to evade detection. Process Doppelgänging: Leverages Windows Transactional NTFS (TxF) and process creation mechanisms to run malicious code in a way that appears legitimate and avoids conventional monitoring. VDSO Hijacking: Modifies the Virtual Dynamic Shared Object (VDSO) in Linux to execute injected code during system or process startup routines. ListPlanting: Manipulates application or window list memory, using this entrypoint for code injection into legitimate processes without overtly altering their main execution flow. T1053 – Scheduled Task/Job Attackers create or modify scheduled tasks to run malware with elevated privileges. These jobs often execute under SYSTEM, root, or service accounts. It provides both persistence and privilege escalation. The scheduled execution blends into normal automated system behavior. At: Attackers use the "at" scheduling utility on Windows or Unix-like systems to set up tasks that run at specific times, enabling persistence or timed execution of malicious programs. Cron: By adding entries to cron on Unix/Linux systems, adversaries can schedule their malicious code to execute automatically at regular intervals, maintaining access without user interaction. Scheduled Task: Threat actors abuse operating system scheduling features (like Windows Task Scheduler) to run unwanted commands or software on startup or according to a set schedule for persistence. Systemd Timers: In Linux environments, attackers configure systemd timers to trigger services or executables at designated times, ensuring regular execution of their payloads even after restarts. Container Orchestration Job: Adversaries leverage cluster scheduling platforms (such as Kubernetes Cron Jobs) to deploy containers that repeatedly execute malicious code across multiple nodes, providing scalable and automated persistence in cloud-native environments. T1078 – Valid Accounts Adversaries use stolen credentials to access legitimate user, admin, or service accounts for initial access, persistence, or privilege escalation, often bypassing security controls by blending in with normal activity. Default Accounts: These are pre-configured accounts built into operating systems or applications, such as guest or administrator; attackers exploit weak, unchanged, or known passwords on these accounts to gain unauthorized access. Domain Accounts: Managed by Active Directory, domain accounts allow users, administrators, or services to access resources across an organization’s network; adversaries leverage compromised domain credentials for lateral movement or privileged actions. Local Accounts: Accounts specific to a single machine or device, often with administrative privileges; attackers use compromised local credentials to escalate rights or maintain control over endpoints. Cloud Accounts: These are accounts for cloud platforms or services (like AWS, Azure, GCP); Those adversaries who obtain these credentials can gain significant control, escalate privileges, or persist in cloud environments. How F5 can help? F5 security solutions, including BIG-IP, NGINX, and Distributed Cloud, provide robust defenses against privilege escalation risks by enforcing strict access controls, role-based permissions, and session validation. These protections mitigate risks from vulnerabilities and misconfigurations that adversaries exploit to elevate privileges. F5’s security capabilities also offer monitoring and threat detection mechanisms that help identify anomalous activities indicative of privilege escalation attempts. For more information, please contact your local F5 sales team. Conclusion Privilege escalation is a critical cyberattack tactic that allows attackers to move from limited access to elevated permissions, often as administrator or root on compromised systems. This expanded control lets attackers disable security measures, steal sensitive data, persist in the environment, and launch more damaging attacks. Preventing and detecting privilege escalation requires layered defenses, vigilant access management, and regular security monitoring to minimize risk and respond quickly to unauthorized privilege gains. Reference Links: MITRE ATT&CK® Privilege Escalation, Tactic TA0004 - Enterprise | MITRE ATT&CK® MITRE ATT&CK: What It Is, How it Works, Who Uses It and Why | F5 Labs94Views2likes1CommentNGINX App Protect v5 Signature Notifications
When working with NAP (NGINX App Protect) you don't have an easy way of knowing when any of the signatures are updated. As an old BigIP guy I find that rather strange. Here you have build-in automatic updates and notifications. Unfortunately there isn't any API's you can probe which would have been the best way of doing it. Hopefully it will come one day. However, "friction" and "hard" will not keep me from finding a solution 😆 I have previously made a solution for NAPv4 and I have tried mentally to get me going on a NAPv5 version. The reason for the delay is in the different way NAPv4 and NAPv5 are designed. Where NAPv4 is one module loaded in NGINX, NAPv5 is completely detached from NGINX (well almost, you still need to load a small module to get the traffic from NGINX to NAP) and only works with containers. NAPv5 has moved the signature "storage" from the actual host it is running on (e.g. an installed package) to the policy. This has the consequence that finding a valid "source of truth", for the latest signature versions, is not as simple as building a new image and see which versions got installed. There are very good reasons for this design that I will come back to later. When you fire up NAPv5 you got three containers for the data plane (NGINX, waf-enforcer and waf-config-mgr) and one for the "control plane" (waf-compiler). For this solution the "control plane" is the useful one. It isn't really a control plane but it gives a nice picture of how it is detached from the actual processing of traffic. When you update your signatures you are actually doing it through the waf-compiler. The waf-compiler is a container hosting the actual signature databases and every time a new verison is released you need to rebuild this container and compile your policies into a new version and reload NGINX. And this is what I take advantage of when I look for signature updates. It has the upside that you only need the waf-compiler to get the information you need. My solution will take care of the entire process and make sure that you are always running with the latest signatures. Back to the reason why the split of functions is a very good thing. When you build a new version of the NGINX image and deploy it into production, NAP needs to compile the policies as they load. During the compilation NGINX is not moving any traffic! This becomes a annoying problem even when you have a low number of policies. I have installations where it takes 5 to 10 minutes from deployment of the new image until it starts moving traffic. That is a crazy long time when you are used to working with micro-services and expect everything to flip within seconds. If you have your NAPv4 hooked up to a NGINX Instance Manager (NIM) the problem is somewhat mitigated as NIM will compile the policies before sending them to the gateways. NIM is not a nimble piece of software so it doesn't always fit into the environment. And now here is my hack to the notification problem: The solution consist of two bash scripts and one html template. The template is used when sending a notification mail. I wanted it to be pretty and that was easiest with html. Strictly speaking you could do with just a simple text based mail. Save all three in the same directory. The main script is called "waf_policy_auto_compile.sh"and is the one you put into crontab. The main script will build a new waf-compiler image and compile a test policy. The outcome of that is information about what versions are the newest. It will then extract versions from an old policy and simply see if any of the versions differ. For this to work you need to have an uncompiled policy (you can just use the default one) and a compiled version of it ready beforehand. When a diff has been identified the notification logic is executed and a second script is called: "compile_waf_policies.sh". It basically just trawls through the directory of you policies and logging profiles and compiles a new version of them all. It is not necessary to recompile the logging profiles, so this will probably change in the next version. As the compilation completes the main script will nudge NGINX to reload thus implement all the new versions. You can run "waf_policy_auto_compile.sh" with a verbose flag (-v) and a debug flag (-d). The verbose flag is intended to be used when you run it on a terminal and want the information displayed there. Debug is, well, for debug 😝 The construction of the scripts are based on my own needs but they should be easy to adjust for any need. I will be happy for any feedback, so please don't hold back 😄 version_report_template.html: <!DOCTYPE html> <html> <head> <meta charset="utf-8"> <title>WAF Policy Version Report</title> <style> body { font-family: system-ui, sans-serif; } .ok { color: #28a745; font-weight: bold; } .warn { color: #f0ad4e; font-weight: bold; } .section { margin-bottom: 1.2em; } .label { font-weight: bold; } </style> </head> <body> <h2>WAF Policy Version Report</h2> <div class="section"> <div class="label">Attack Signatures:</div> <div>Current: <span>{{ATTACK_OLD}}</span></div> <div>New: <span>{{ATTACK_NEW}}</span></div> <div>Status: <span class="{{ATTACK_CLASS}}">{{ATTACK_STATUS}}</span></div> </div> <div class="section"> <div class="label">Bot Signatures:</div> <div>Current: <span>{{BOT_OLD}}</span></div> <div>New: <span>{{BOT_NEW}}</span></div> <div>Status: <span class="{{BOT_CLASS}}">{{BOT_STATUS}}</span></div> </div> <div class="section"> <div class="label">Threat Campaigns:</div> <div>Current: <span>{{THREAT_OLD}}</span></div> <div>New: <span>{{THREAT_NEW}}</span></div> <div>Status: <span class="{{THREAT_CLASS}}">{{THREAT_STATUS}}</span></div> </div> <div>Run completed: {{RUN_DATETIME}}</div> </body> </html> compile_waf_policies.sh: #!/bin/bash # ============================================================================== # Script Name: compile_waf_policies.sh # # Description: # Compiles: # 1. WAF policy JSON files from the 'policies' directory # 2. WAF logging JSON files from the 'logging' directory # using the 'waf-compiler-latest:custom' Docker image. Output goes to # '/opt/napv5/app_protect_etc_config' where NGINX and waf-config-mgr # can reach them. # # Requirements: # - Docker installed and accessible # - Docker image 'waf-compiler-latest:custom' present locally # # Usage: # ./compile_waf_policies.sh # ============================================================================== set -euo pipefail IFS=$'\n\t' SECONDS=0 # Track total execution time # ======================== # CONFIGURABLE VARIABLES # ======================== BASE_DIR="/root/napv5/waf-compiler" OUTPUT_DIR="/opt/napv5/app_protect_etc_config" POLICY_INPUT_DIR="$BASE_DIR/policies" POLICY_OUTPUT_DIR="$OUTPUT_DIR" LOGGING_INPUT_DIR="$BASE_DIR/logging" LOGGING_OUTPUT_DIR="$OUTPUT_DIR" GLOBAL_SETTINGS="$BASE_DIR/global_settings.json" DOCKER_IMAGE="waf-compiler-latest:custom" # ======================== # VALIDATION # ======================== echo "🔧 Validating paths..." [[ -d "$POLICY_INPUT_DIR" ]] || { echo "❌ Error: Policy input directory '$POLICY_INPUT_DIR' does not exist."; exit 1; } [[ -f "$GLOBAL_SETTINGS" ]] || { echo "❌ Error: Global settings file '$GLOBAL_SETTINGS' not found."; exit 1; } mkdir -p "$POLICY_OUTPUT_DIR" mkdir -p "$LOGGING_OUTPUT_DIR" # ======================== # POLICY COMPILATION # ======================== echo "📦 Compiling WAF policies from: $POLICY_INPUT_DIR" for POLICY_FILE in "$POLICY_INPUT_DIR"/*.json; do [[ -f "$POLICY_FILE" ]] || continue BASENAME=$(basename "$POLICY_FILE" .json) OUTPUT_FILE="$POLICY_OUTPUT_DIR/${BASENAME}.tgz" echo "⚙️ [Policy] Compiling $(basename "$POLICY_FILE") -> $(basename "$OUTPUT_FILE")" docker run --rm \ -v "$POLICY_INPUT_DIR":"$POLICY_INPUT_DIR" \ -v "$POLICY_OUTPUT_DIR":"$POLICY_OUTPUT_DIR" \ -v "$(dirname "$GLOBAL_SETTINGS")":"$(dirname "$GLOBAL_SETTINGS")" \ "$DOCKER_IMAGE" \ -g "$GLOBAL_SETTINGS" \ -p "$POLICY_FILE" \ -o "$OUTPUT_FILE" done # ======================== # LOGGING COMPILATION # ======================== echo "📝 Compiling WAF logging configs from: $LOGGING_INPUT_DIR" if [[ -d "$LOGGING_INPUT_DIR" ]]; then for LOG_FILE in "$LOGGING_INPUT_DIR"/*.json; do [[ -f "$LOG_FILE" ]] || continue BASENAME=$(basename "$LOG_FILE" .json) OUTPUT_FILE="$LOGGING_OUTPUT_DIR/${BASENAME}.tgz" echo "⚙️ [Logging] Compiling $(basename "$LOG_FILE") -> $(basename "$OUTPUT_FILE")" docker run --rm \ -v "$LOGGING_INPUT_DIR":"$LOGGING_INPUT_DIR" \ -v "$LOGGING_OUTPUT_DIR":"$LOGGING_OUTPUT_DIR" \ "$DOCKER_IMAGE" \ -l "$LOG_FILE" \ -o "$OUTPUT_FILE" done else echo "⚠️ Skipping logging config compilation: directory '$LOGGING_INPUT_DIR' does not exist." fi # ======================== # COMPLETION MESSAGE # ======================== RUNTIME=$SECONDS printf "\n✅ Compilation complete.\n" echo " - Policies output: $POLICY_OUTPUT_DIR" echo " - Logging output: $LOGGING_OUTPUT_DIR" echo printf "⏱️ Total time taken: %02d minutes %02d seconds\n" $((RUNTIME / 60)) $((RUNTIME % 60)) echo waf_policy_auto_compile.sh: #!/bin/bash ############################################################################### # waf_policy_auto_compile.sh # # - Only prints colorized summary output to terminal if -v/--verbose is used # - Mails a styled HTML report using a template, substituting version numbers/status/colors # - Debug output (step_log) only to syslog if -d/--debug is used # - Otherwise: completely silent except for errors # - All main blocks are modularized in functions ############################################################################### set -euo pipefail IFS=$'\n\t' # ===== CONFIGURABLE VARIABLES ===== WORKROOT="/root/napv5" WORKDIR="$WORKROOT/waf-compiler" DOCKERFILE="$WORKDIR/Dockerfile" BUNDLE_DIR="$WORKDIR/test" NEW_BUNDLE="$BUNDLE_DIR/test_new.tgz" OLD_BUNDLE="$BUNDLE_DIR/test_old.tgz" NEW_META="$BUNDLE_DIR/test_new_meta.json" COMPILER_IMAGE="waf-compiler-latest:custom" EMAIL_RECIPIENT="example@example.com" EMAIL_SUBJECT="WAF Compiler Update Notification" NGINX_RELOAD_CMD="docker exec nginx-plus nginx -s reload" HTML_TEMPLATE="$WORKDIR/version_report_template.html" HTML_REPORT="$WORKDIR/version_report.html" VERBOSE=0 DEBUG=0 # ===== DEBUG AND ERROR LOGGING ===== exec 2> >(tee -a /tmp/waf_policy_auto_compile_error.log | /usr/bin/logger -t waf_policy_auto_compile_error) step_log() { if [ "$DEBUG" -eq 1 ]; then echo "DEBUG: $1" | /usr/bin/logger -t waf_policy_auto_compile fi } # ===== ARGUMENT PARSING ===== while [[ $# -gt 0 ]]; do case "$1" in -v|--verbose) VERBOSE=1 shift ;; -d|--debug) DEBUG=1 echo "Debug log can be found in the syslog..." shift ;; -*) echo "Unknown option: $1" >&2 exit 1 ;; *) shift ;; esac done # ----- LOG INITIAL ENVIRONMENT IF DEBUG ----- step_log "waf_policy_auto_compile starting (PID $$)" step_log "Script PATH: $PATH" step_log "which docker: $(which docker 2>/dev/null)" step_log "which jq: $(which jq 2>/dev/null)" # ===== COLOR DEFINITIONS ===== color_reset="\033[0m" color_green="\033[1;32m" color_yellow="\033[1;33m" # ===== LOGGING FUNCTIONS ===== log() { # Only log to terminal if VERBOSE is enabled if [ "$VERBOSE" -eq 1 ]; then echo "[$(date --iso-8601=seconds)] $*" fi } # ===== HTML REPORT GENERATOR ===== generate_html_report() { local attack_old="$1" local attack_new="$2" local attack_status="$3" local attack_class="$4" local bot_old="$5" local bot_new="$6" local bot_status="$7" local bot_class="$8" local threat_old="$9" local threat_new="${10}" local threat_status="${11}" local threat_class="${12}" local datetime datetime=$(date --iso-8601=seconds) cp "$HTML_TEMPLATE" "$HTML_REPORT" sed -i "s|{{ATTACK_OLD}}|$attack_old|g" "$HTML_REPORT" sed -i "s|{{ATTACK_NEW}}|$attack_new|g" "$HTML_REPORT" sed -i "s|{{ATTACK_STATUS}}|$attack_status|g" "$HTML_REPORT" sed -i "s|{{ATTACK_CLASS}}|$attack_class|g" "$HTML_REPORT" sed -i "s|{{BOT_OLD}}|$bot_old|g" "$HTML_REPORT" sed -i "s|{{BOT_NEW}}|$bot_new|g" "$HTML_REPORT" sed -i "s|{{BOT_STATUS}}|$bot_status|g" "$HTML_REPORT" sed -i "s|{{BOT_CLASS}}|$bot_class|g" "$HTML_REPORT" sed -i "s|{{THREAT_OLD}}|$threat_old|g" "$HTML_REPORT" sed -i "s|{{THREAT_NEW}}|$threat_new|g" "$HTML_REPORT" sed -i "s|{{THREAT_STATUS}}|$threat_status|g" "$HTML_REPORT" sed -i "s|{{THREAT_CLASS}}|$threat_class|g" "$HTML_REPORT" sed -i "s|{{RUN_DATETIME}}|$datetime|g" "$HTML_REPORT" } # ===== BUILD COMPILER IMAGE ===== build_compiler() { step_log "about to build_compiler" docker build --no-cache --platform linux/amd64 \ --secret id=nginx-crt,src="$WORKROOT/nginx-repo.crt" \ --secret id=nginx-key,src="$WORKROOT/nginx-repo.key" \ -t "$COMPILER_IMAGE" \ -f "$DOCKERFILE" "$WORKDIR" > "$WORKDIR/waf_compiler_build.log" 2>&1 || { echo "ERROR: docker build failed. Dumping build log:" | /usr/bin/logger -t waf_policy_auto_compile_error cat "$WORKDIR/waf_compiler_build.log" | /usr/bin/logger -t waf_policy_auto_compile_error exit 1 } step_log "after build_compiler" } # ===== COMPILE TEST POLICY ===== compile_test_policy() { step_log "about to compile_test_policy" docker run --rm -v "$BUNDLE_DIR:/bundle" "$COMPILER_IMAGE" \ -p /bundle/test.json -o /bundle/test_new.tgz > "$NEW_META" step_log "after compile_test_policy" if [ -f "$NEW_META" ]; then step_log "$(cat "$NEW_META")" else step_log "NEW_META does not exist" fi } # ===== CHECK OLD_BUNDLE ===== check_old_bundle() { step_log "about to check OLD_BUNDLE" if [ -f "$OLD_BUNDLE" ]; then step_log "$(ls -l "$OLD_BUNDLE")" else step_log "OLD_BUNDLE does not exist" fi } # ===== GET NEW VERSIONS FUNCTION ===== get_new_versions() { jq -r ' { "attack": .attack_signatures_package.version, "bot": .bot_signatures_package.version, "threat": .threat_campaigns_package.version }' "$NEW_META" } # ===== VERSION EXTRACTION FROM OLD BUNDLE ===== extract_bundle_versions() { docker run --rm -v "$BUNDLE_DIR:/bundle" "$COMPILER_IMAGE" \ -dump -bundle "/bundle/test_old.tgz" } extract_versions_from_dump() { extract_bundle_versions | awk ' BEGIN { print "{" } /attack-signatures:/ { in_attack=1; next } /bot-signatures:/ { in_bot=1; next } /threat-campaigns:/ { in_threat=1; next } in_attack && /version:/ { gsub("version: ", "") printf "\"attack\":\"%s\",\n", $1 in_attack=0 } in_bot && /version:/ { gsub("version: ", "") printf "\"bot\":\"%s\",\n", $1 in_bot=0 } in_threat && /version:/ { gsub("version: ", "") printf "\"threat\":\"%s\"\n", $1 in_threat=0 } END { print "}" } ' } get_old_versions() { extract_versions_from_dump } # ===== GET & PRINT VERSIONS ===== get_versions() { step_log "about to get_new_versions" new_versions=$(get_new_versions) step_log "new_versions: $new_versions" step_log "after get_new_versions" step_log "about to get_old_versions" old_versions=$(get_old_versions) step_log "old_versions: $old_versions" step_log "after get_old_versions" } # ===== VERSION COMPARISON ===== compare_versions() { step_log "compare_versions start" attack_old=$(echo "$old_versions" | jq -r .attack) attack_new=$(echo "$new_versions" | jq -r .attack) bot_old=$(echo "$old_versions" | jq -r .bot) bot_new=$(echo "$new_versions" | jq -r .bot) threat_old=$(echo "$old_versions" | jq -r .threat) threat_new=$(echo "$new_versions" | jq -r .threat) attack_status=$([[ "$attack_old" != "$attack_new" ]] && echo "Updated" || echo "No Change") bot_status=$([[ "$bot_old" != "$bot_new" ]] && echo "Updated" || echo "No Change") threat_status=$([[ "$threat_old" != "$threat_new" ]] && echo "Updated" || echo "No Change") attack_class=$([[ "$attack_status" == "Updated" ]] && echo "warn" || echo "ok") bot_class=$([[ "$bot_status" == "Updated" ]] && echo "warn" || echo "ok") threat_class=$([[ "$threat_status" == "Updated" ]] && echo "warn" || echo "ok") echo "Attack:$attack_status Bot:$bot_status Threat:$threat_status" > "$WORKDIR/status_flags.txt" [[ "$attack_status" == "Updated" ]] && attack_status_colored="${color_yellow}*** Updated ***${color_reset}" || attack_status_colored="${color_green}No Change${color_reset}" [[ "$bot_status" == "Updated" ]] && bot_status_colored="${color_yellow}*** Updated ***${color_reset}" || bot_status_colored="${color_green}No Change${color_reset}" [[ "$threat_status" == "Updated" ]] && threat_status_colored="${color_yellow}*** Updated ***${color_reset}" || threat_status_colored="${color_green}No Change${color_reset}" { echo -e "Version comparison for container \033[1mNAPv5\033[0m:\n" echo -e "Attack Signatures:" echo -e " Current Version: $attack_old" echo -e " New Version: $attack_new" echo -e " Status: $attack_status_colored\n" echo -e "Threat Campaigns:" echo -e " Current Version: $threat_old" echo -e " New Version: $threat_new" echo -e " Status: $threat_status_colored\n" echo -e "Bot Signatures:" echo -e " Current Version: $bot_old" echo -e " New Version: $bot_new" echo -e " Status: $bot_status_colored" } > "$WORKDIR/version_report.ansi" sed 's/\x1B\[[0-9;]*[mK]//g' "$WORKDIR/version_report.ansi" > "$WORKDIR/version_report.txt" step_log "Calling log_versions_syslog" log_versions_syslog "$attack_old" "$attack_new" "$attack_status" "$attack_class" \ "$bot_old" "$bot_new" "$bot_status" "$bot_class" \ "$threat_old" "$threat_new" "$threat_status" "$threat_class" step_log "compare_versions finished" } # ===== SYSLOG VERSION LOGGING and HTML REPORT GEN ===== log_versions_syslog() { # Args: # 1-attack_old 2-attack_new 3-attack_status 4-attack_class # 5-bot_old 6-bot_new 7-bot_status 8-bot_class # 9-threat_old 10-threat_new 11-threat_status 12-threat_class local msg msg="AttackSig (current: $1, latest: $2), BotSig (current: $5, latest: $6), ThreatCamp (current: $9, latest: $10)" /usr/bin/logger -t waf_policy_auto_compile "$msg" # Also print to terminal if VERBOSE is enabled if [ "$VERBOSE" -eq 1 ]; then echo "$msg" fi # Always (re)generate HTML for the mail at this point generate_html_report "$@" } # ===== RESPONSE ACTIONS ===== compile_all_policies() { log "Change detected – compiling all policies..." if [ "$VERBOSE" -eq 1 ]; then "$WORKDIR/compile_waf_policies.sh" else "$WORKDIR/compile_waf_policies.sh" > /dev/null 2>&1 fi } reload_nginx() { log "Reloading NGINX..." eval "$NGINX_RELOAD_CMD" } rotate_bundles() { log "Archiving new test bundle as old..." mv "$NEW_BUNDLE" "$OLD_BUNDLE" rm -f "$NEW_META" } send_report_email() { local html_report="$1" mail -s "$EMAIL_SUBJECT" -a "Content-Type: text/html" "$EMAIL_RECIPIENT" < "$html_report" } # ===== MAIN LOGIC ===== main() { build_compiler compile_test_policy check_old_bundle get_versions compare_versions if [[ "$VERBOSE" -eq 1 ]]; then cat "$WORKDIR/version_report.ansi" fi if grep -q "Updated" "$WORKDIR/status_flags.txt"; then if [[ "$VERBOSE" -eq 1 ]]; then echo "Detected updates. Recompiling policies, reloading NGINX, sending report." fi compile_all_policies reload_nginx rotate_bundles send_report_email "$HTML_REPORT" else log "No changes detected – nothing to do." fi log "Done." } main "$@" And should be it.275Views2likes4CommentsMitigating OWASP Web Application Security Top 10 risks using F5 NGINX App Protect
The OWASP Web Application Security Top 10 outlines the most critical security risks to web applications, serving as a global standard for understanding and mitigating vulnerabilities. Based on data from over 500,000 real-world applications, the list highlights prevalent security issues. The 2021 edition introduces new categories such as "Insecure Design" and "Software and Data Integrity Failures" emphasizing secure design principles and proactive security throughout the software development lifecycle. For more information please visit: OWASP Web Application Security Top 10 - 2021 F5 products provide controls to secure applications against these risks. F5 NGINX App Protect offers security controls using both positive and negative security models to protect applications from OWASP Top 10 risks. The positive security model combines validated user sessions, user input, and application response, while the negative security model uses attack signatures to detect and block OWASP Top 10 application security threats. This guide outlines how to implement effective protection based on the specific needs of your application. Note - The OWASP Web Application Security Top 10 risks listed below are tested on both F5 NGINX App Protect versions 4.x and 5.x A01:2021-Broken Access Control Problem statement: As the risk name suggests, Broken Access Control refers to failures in access control mechanisms that lead to a vulnerable application. In this demonstration, the application is susceptible to “Directory/Path Traversal” via the URL, which allows unauthorized access to sensitive information stored on the server. Solution: F5 NGINX App Protect WAF(Web Application Firewall) offers an inherent solution to the “Directory/Path Traversal” vulnerability discussed, through its “app_protect_default_policy” bundle. This policy, which will be active by default when “App Protect” is enabled in the nginx configuration, helps prevent Directory/Path Traversal attacks by validating the values provided to the “page” key in URL. The attack request is recorded in the security log, indicating that the attack type is Predictable Resource Location, Path Traversal. The request was blocked, and the signatures responsible for detecting the attack are also visible. Note: The security log shown in the image below is not the default log configuration but has been customized by following the instructions provided in the link. A02:2021-Cryptographic Failures Problem statement: Earlier this attack was known as “Sensitive Data Exposure”, focusing on cryptographic failures that often result in the exposure of sensitive data. The “Juice Shop” demo application, as demonstrated below, is vulnerable to sensitive information disclosure due to the insecure storage of data, which is displayed in plain text to end users. Solution: F5 NGINX App Protect WAF provides best in class “Data Guard” policy, which can block as well as mask (based on policy configuration) sensitive information displayed to the end users. After applying the policy to mask the sensitive data, it’s observed the sensitive information which was visible(Fig. 2.1) is masked now. The attack request is recorded in the security log, indicating that the dataguard_mask policy is triggered, and the request was alerted. . 2.4 – Request captured in NGINX App Protect security log A03:2021-Injection Problem statement: An injection vulnerability arises when an application fails to properly handle user-supplied data, sending it to an interpreter (e.g., a database or operating system) as part of a query or command. Without proper validation, filtering, or sanitization, attackers can inject malicious code, leading to unauthorized access, data breaches, privilege escalation, or system compromise. For example, the DVWA demo application shown below lacks input validation, making it vulnerable to SQL injection attacks that can compromise confidential data. Solution: F5 NGINX App Protect WAF has a robust set of attack signatures which are pre-bundled in default policy. The SQL-Injection vulnerability discussed above can be prevented by enabling App Protect which has around 1000+ signatures related to variety of Injection attacks. The attack request is recorded in the security log, indicating that the attack type is SQL-Injection. The request was blocked, and the signatures responsible for detecting the attack are also visible. A04:2021-Insecure Design Problem statement: The growing reliance on web applications exposes them to security risks, with insecure design being a key concern. For example, a retail chain’s e-commerce website lacks protection against bots used by scalpers to buy high-end video cards in bulk for resale. This causes negative publicity and frustrates genuine customers. Implementing anti-bot measures and domain logic rules can help block fraudulent transactions, with F5 NGINX App Protect providing effective protection against such attacks. Solution: Secure design is an ongoing process that continuously evaluates threats, ensures robust code, and integrates threat modeling into development. It involves constant validation, accurate flow analysis, and thorough documentation. By using F5 NGINX App Protect WAF, which includes bot defense, web applications can effectively prevent bot-driven attacks, identifying and blocking them early to protect against fraudulent transactions. The attack request is recorded in the security log, indicating that the attack type is Non-browser Client. The request was blocked, and the violation stating “VIOL_BOT_CLIENT”. Note: The security log shown in the image below is the default log configuration Request captured in NGINX App Protect security log A05:2021-Security Misconfiguration Problem statement: Security misconfiguration occurs when security settings are improperly configured, exposing web applications to various threats. One such vulnerability is Cross-Site Request Forgery (CSRF), where attackers trick authenticated users into making unauthorized requests. Without proper protection mechanisms, attackers can exploit this misconfiguration to perform malicious actions on behalf of the user. The demonstration using WebGoat below shows how an improperly configured application becomes vulnerable to CSRF, allowing attackers to carry out unauthorized actions. Execute the above malicious script by copying the file path and pasting in new tab of the WebGoat authenticated browser. The script will automatically load the malicious code and redirects to the vulnerable page. Solution: F5 NGINX App Protect WAF provides a comprehensive support against CSRF attack. Users can configure the CSRF policy based on their requirements by following the configuration settings here. In this demonstration, default CSRF policy is used to block the attack. Default CSRF policy used to block CSRF attacks The security log captures the attack request, identifying the type of attack which is CSRF. The request was successfully blocked, and the violations saying “CSRF attack detected” is also visible. A06:2021-Vulnerable and Outdated Components Problem statement: Vulnerable and Outdated Components risk arises when a web application uses third-party libraries or software with known security vulnerabilities that are not updated. Additionally, vulnerable pages like “phpmyadmin.php” that expose sensitive details—such as application versions, user credentials, and database information—further increase the risk. Attackers can use this information to exploit known vulnerabilities or gain unauthorized access, leading to potential data breaches or system compromise. Solution: The vulnerability discussed above can be mitigated using F5 NGINX App Protect WAF Attack Signatures, which includes specific "Signature ID" for various vulnerabilities. These Signature IDs can be incorporated into the policy file to block attacks. For instance, Signature ID 200000014 can be used to block access to phpmyadmin.php page. Attack signatures can be found here. The attack request is recorded in the security log, indicating that the attack type is Predictable Resource Location. The request was blocked, and the signatures responsible for detecting the “/phpmyadmin/ page” attack are also visible. A07:2021-Identification and Authentication Failures Problem statement: Effective authentication and secure session management are crucial in preventing authentication-related vulnerabilities in daily tasks. Applications with weak authentication mechanisms are vulnerable to automated attacks, such as credential stuffing, where attackers use wordlists to perform spray attacks, allowing attackers to determine whether specific credentials are valid, thus increasing the risk of brute-force and other automated attacks. Brute force attacks are attempts to break in to secured areas of a web application by trying exhaustive, systematic, username/password combinations to discover legitimate authentication credentials. Solution: To prevent brute force attacks, F5 NGINX App Protect WAF monitors IP addresses, usernames, and the number of failed login attempts beyond a maximum threshold. When brute force patterns are detected, the F5 NGINX App Protect WAF policy either trigger an alarm or block the attack if the failed login attempts reached a maximum threshold for a specific username or coming from a specific IP address. Note – Brute force attack prevention is supported starting from versions v4.13 and v5.5 The security log captures the attack request, identifying the type of attack as Brute Force Attack. The request was successfully blocked, and the “VIOL_BRUTE_FORCE” violations is also visible. A08:2021-Software and Data Integrity Failures Problem statement: Added as a new entry in the OWASP Top 10 2021, software and data integrity failures, particularly in the context of insecure deserialization, occur when an application deserializes untrusted data without proper validation or security checks. This vulnerability allows attackers to modify or inject malicious data into the deserialization process, potentially leading to remote code execution, privilege escalation, or data manipulation. In this demonstration, a serialized PHP command O:18:"PHPObjectInjection":1:{s:6:"inject";s:18:"system ('ps -ef');";} is passed in the URL to retrieve the running processes. Solution: F5 NGINX App Protect WAF can prevent Serialization Injection PHP attacks by leveraging its default policy bundle, which includes an extensive set of signatures specifically designed to address deserialization vulnerabilities. The security log captures the attack request, identifying the type of attack. The request was successfully blocked, and the signatures used to detect the 'PHP Short Object Serialization Injection' attack are also visible. A09:2021-Security Logging and Monitoring Failures Problem statement: Security logging and monitoring failures occur when critical application activities such as logins, transactions, and user actions are not adequately logged or monitored. This lack of visibility makes it difficult to detect and respond to security breaches, attack attempts, or suspicious user behavior. Without proper logging and monitoring, attackers can exploit vulnerabilities without detection, potentially leading to data loss, revenue impact, or reputational damage. Insufficient logging also hinders the ability to escalate and mitigate security incidents effectively, making the application more vulnerable to exploitation. Solution: F5 NGINX App Protect WAF provides different options to track logging details of applications for end-to-end visibility of every request both from a security and performance perspective. Users can change configurations as per their requirements and can also configure different logging mechanisms with different levels. Check the links below for more details on logging: Version 4 and earlier Version 5 A10:2021-Server-Side Request Forgery Problem statement: Server-Side Request Forgery (SSRF) occurs when a web application fetches a remote resource without properly validating the user-supplied URL. This vulnerability allows attackers to manipulate the application into sending malicious requests to internal systems or external resources, bypassing security measures like firewalls or VPNs. SSRF attacks can expose sensitive internal data or resources that are not meant to be publicly accessible, making them a significant security risk, especially with modern cloud architectures. In this demonstration, patient health records, which should be accessible only within the network, can be retrieved publicly through SSRF. Solution: Server-Side Request Forgery (SSRF) attacks can be prevented by utilizing the default policy bundle of F5 NGINX App Protect WAF, which includes a comprehensive set of signatures designed to detect and mitigate SSRF vulnerabilities. By enabling App Protect, you gain strong defense against SSRF attacks as well as other prevalent security threats, thanks to the default policy's pre-configured signatures that cover a wide range of attack vectors. The security log captures the attack request, identifying the type of attack. The request was successfully blocked, and the signatures used to detect the 'SSRF' attack are also visible. Request captured in NGINX App Protect security log Conclusion: Protecting applications from attacks is simple with F5 NGINX App Protect WAF, a high-performance, lightweight, and platform-agnostic solution that supports diverse deployment options, from edge load balancers to Kubernetes clusters. By leveraging its advanced security controls, organizations can effectively mitigate the OWASP Web Application Security Top 10 risks, ensuring robust protection across distributed architectures and hybrid environments. Ultimately, F5 NGINX App Protect helps strengthen overall security, providing comprehensive defense for modern applications. References: F5 NGINX App Protect WAF OWASP Top 10 - 2021 F5 NGINX App Protect WAF Documentation F5 Attack Signatures650Views2likes1CommentMitigate OWASP LLM Security Risk: Sensitive Information Disclosure Using F5 NGINX App Protect
This short WAF security article covered the critical security gaps present in current generative AI applications, emphasizing the urgent need for robust protection measures in LLM design deployments. Finally we also demonstrated how F5 Nginx App Protect v5 offers an effective solution to mitigate the OWASP LLM Top 10 risks.521Views2likes0CommentsProtecting gRPC based APIs with NGINX App Protect
gRPC support on NGINX Developed back in 2015, gRPC keeps attracting more and more adopters due to the use of HTTP/2.0 as efficient transport, tight integration with interface description language (IDL), bidirectional streaming, flow control, bandwidth effective binary payload, and a lot more other benefits. About two years ago NGINX started to support gRPC (link) as a gateway. However, the market quickly realized that (like any other gateway) it is subject to cyber-attacks and requires strong defense. As a response for such challenges, App Protect WAF for NGINX just released a compelling set of security features to defend gRPC based services. gRPC Security It is a fact that App Protect for NGINX provides much more advanced security and performance than any ModSecurity based WAFs (most of the WAF market). Hence, even before explicit gRPC support, App Protect armory in conjunction with NGINX itself could protect web services from a wide variety of threats like: Injection attacks Sensitive data leakage OS Command execution Buffer Overflow Threat Campaigns Authentication attacks Denial-of-service and more (link) With gRPC support, App Protect provides an even deeper level of security. The newly added gRPC content profile allows to parse binary payload, make sure there is no malicious data, and ensures its structure conforms to interface definition (protocol buffers) (link). gRPC Profile Similar to JSON and XML profiles gRPC profile attaches to a subset of URLs and serves to define and enforce a payload structure. gRPC profile extracts application URLs and request/response structures from Interface Definition Language (IDL) file. IDL file is a mandatory part of every gRPC based application. Following policy listing shows an example of referencing the IDL file from a gRPC profile. { "policy": { "name": "online-boutique-policy", "grpc-profiles": [ { "name": "hipstershop-grpc-profile", "defenseAttributes": { "maximumDataLength": 100, "allowUnknownFields": true }, "idlFiles": [ { "idlFile": { "$ref": "file:///hipstershop/demo.proto" }, "isPrimary": true } ] ...omitted... } ], ...omitted... } } gRPC profile references the IDL file to extract all required data to instantiate a positive security model. This means that all URLs and payload formats from it will be considered as valid and pass. To catch anomalies in the gRPC traffic, App Protect introduces three kinds of violations. Requests that don't match IDL trigger "VIOL_GRPC_MALFORMED" or "VIOL_GRPC_METHOD". Requests with unknown or longer than allowed fields cause "VIOL_GRPC_FORMAT" violation. In addition to the above checkups, App Protect looks up signatures or disallowed meta characters in gRPC data. Because of this, it protects applications from a wide variety of attacks that worked for plain HTTP traffic. The following listing gives an example of signatures and meta characters enforcement in gRPS profile (docs). "grpc-profiles": [ { "name": "online-boutique-profile", "attackSignaturesCheck": true, "signatureOverrides": [ { "signatureId": 200001213, "enabled": false }, { "signatureId": 200089779, "enabled": false } ], "metacharCheck": true, ...omitted... } ], Example Sandbox Here is an example of how to configure NGINX as a gRPC gateway and defend it with the App Protect. As a demo application, I use "Online Boutique" (link). This application consists of multiple micro-services that talk to each other in gRPC. The picture below represents the structure of entire application. Picture 1. I slightly modified the application deployment such that the frontend doesn't talk to micro-services directly but through NGINX gateway that proxies all calls. Picture 2. Before I jump to App Protect configuration, here is how NGINX config looks like for proxying gRPC services. http { include /etc/nginx/mime.types; default_type application/octet-stream; sendfile on; keepalive_timeout 65; include /etc/nginx/conf.d/upstreams.conf; server { server_name boutique.online; listen 443 http2 ssl; ssl_certificate /etc/nginx/ssl/nginx.crt; ssl_certificate_key /etc/nginx/ssl/nginx.key; ssl_protocols TLSv1.2 TLSv1.3; include conf.d/errors.grpc_conf; default_type application/grpc; app_protect_enable on; app_protect_policy_file "/etc/app_protect/conf/policies/online-boutique-policy.json"; app_protect_security_log_enable on; app_protect_security_log "/opt/app_protect/share/defaults/log_grpc_all.json" stderr; include conf.d/locations.conf; } } The listing above is self-explaining. NGINX virtual server "boutique.online" listens on port 443 for HTTP2 requests. Requests are routed to one of a micro-service from "upstreams.conf" based on the map defined in "locations.conf". Below are examples of these config files. $ cat conf.d/locations.conf upstream adservice { server 10.101.11.63:9555; } location /hipstershop.CartService/ { grpc_pass grpc://cartservice; } ...omitted... $ cat conf.d/uptsreams.conf location /hipstershop.AdService/ { grpc_pass grpc://adservice; } upstream cartservice { server 10.99.75.80:7070; } ...omitted... For instance, any call with URL starting from "/hipstershop.AdService" is routed to "adservice" upstream and so on. For more details on NGINX configuration for gRPC refer to this blog article or official documentation. App Protect is enabled on the virtual server. Hence, all requests are subject to inspection. Let's take a closer look at the security policy applied to the virtual server above. { "policy": { "name": "online-boutique-policy", "grpc-profiles": [ { "name": "online-boutique-profile", "idlFiles": [ { "idlFile": { "$ref": "https://raw.githubusercontent.com/GoogleCloudPlatform/microservices-demo/master/pb/demo.proto" }, "isPrimary": true } ] "associateUrls": true, "defenseAttributes": { "maximumDataLength": 10000, "allowUnknownFields": false }, "attackSignaturesCheck": true, "signatureOverrides": [ { "signatureId": 200001213, "enabled": true }, { "signatureId": 200089779, "enabled": true } ], "metacharCheck": true, } ], "urls": [ { "name": "*", "type": "wildcard", "method": "*", "$action": "delete" } ] } } The policy has one gRPC profile called "online-boutique-profile". Profile references IDL file for the demo application (similar to open API file reference) as a source of the application structure. "associateUrls: true" directive instructs App Protect to extract all possible URLs from IDL file and enforce parent profile on them. Notice URL section removes wildcard URL "*" from the policy to only allow URLs that are in IDL and therefore establish a positive security model. "defenseAttributes" directive enforces payload length and tolerance to unknown parameters. "attackSignaturesCheck" and "metaCharactersCheck" directives look for a malicious pattern in the entire request. Now let's see what does this policy block and pass. Experiments First of all, let's make sure that valid traffic passes. As an example, I construct a valid call to "Ads" micro-service based on IDL content below. syntax = "proto3"; package hipstershop; service AdService { rpc GetAds(AdRequest) returns (AdResponse) {} } message AdRequest { repeated string context_keys = 1; } Based on the definition above a valid call to the service should go to "/hipstershop.AdService/GetAds" URL and contain "context_keys" identifiers in a payload. I use the "grpcurl" tool to construct and send the call that passes. $ grpcurl -proto ../microservices-demo/pb/demo.proto -d '{"context_keys": "example"}' boutique.online:8443 hipstershop.AdService/GetAds { "ads": [ { "redirectUrl": "/product/2ZYFJ3GM2N", "text": "Film camera for sale. 50% off." }, { "redirectUrl": "/product/0PUK6V6EV0", "text": "Vintage record player for sale. 30% off." } ] } As you may note, the URL constructs out of package name, service name, and method name from IDL. Therefore it is expected that all calls which don't comply IDL definition will be blocked. A call to invalid service. $ curl -X POST -k --http2 -H "Content-Type: application/grpc" -H "TE: trailers" https://boutique.online:8443/hipstershop.DoesNotExist/GetAds <html><head><title>Request Rejected</title></head><body>The requested URL was rejected. Please consult with your administrator.<br><br>Your support ID is: 16472380185462165521<br><br><a href='javascript:history.back();'>[Go Back]</a></body></html> A call to an unknown service. Notice that the previous call got "html" response page when this one got a special "grpc" response. This happened because only valid URLs considered as type gRPC others are "html" by default. A call to an invalid method. $ curl -v -X POST -k --http2 -H "Content-Type: application/grpc" -H "TE: trailers" https://boutique.online:8443/hipstershop.AdService/DoesNotExist < HTTP/2 200 < content-type: application/grpc; charset=utf-8 < cache-control: no-cache < grpc-message: Operation does not comply with the service requirements. Please contact you administrator with the following number: 16472380185462166031 < grpc-status: 3 < pragma: no-cache < content-length: 0 A call with junk in the payload. curl -v -X POST -k --http2 -H "Content-Type: application/grpc" -H "TE: trailers" https://boutique.online:8443/hipstershop.AdService/GetAds -d@trash_payload.bin < HTTP/2 200 < content-type: application/grpc; charset=utf-8 < cache-control: no-cache < grpc-message: Operation does not comply with the service requirements. Please contact you administrator with the following number: 13966876727165538516 < grpc-status: 3 < pragma: no-cache < content-length: 0 All gRPC wise invalid calls are blocked. In the same way attack signatures are caught in gRPC payload ("alert() (Parameter)" signature). $ grpcurl -proto ../microservices-demo/pb/demo.proto -d '{"context_keys": "example"}' boutique.online:8443 hipstershop.AdService/GetAds { "ads": [ { "redirectUrl": "/product/2ZYFJ3GM2N", "text": "Film camera for sale. 50% off." }, { "redirectUrl": "/product/0PUK6V6EV0", "text": "Vintage record player for sale. 30% off." } ] } Conclusion With gRPC support App Protect provides even deeper controls for gRPC traffic along with all existing security inventory available for plain HTTP traffic. Keep in mind that this release only supports Unary gRPC traffic and doesn't support the server reflection feature. Refer to the official documentation for detailed information on gRPC support (link).2.5KViews2likes0Comments